I’ve shown an example of the “Hello World” in IoT, a blinking light, in this post. Blinking lights are great and make for a nice visual experience, but what if we want to do something with an IoT device, such as a NodeMCU ESP8266 that goes beyond the visual? Let’s take our NodeMCU and add a temperature sensor. Then, with MicroPython, we’ll get our readings.
Needed Equipment
To get started on this project you’ll need the following equipment:
- NodeMCU ESP8266
- TMP36 Analog
Temperature Sensor
- Mini Breadboard 5.5×8.2×0.85cm
- Male to Male Jumper Wires
I have found this kit of basic electronic components to be pretty good for starting one’s IoT device journey. It doesn’t include things like the TMP36 temperature sensor, but it has a wide variety of other pieces that are ultimately useful.
TMP36 Specs
Since this project will be using the TMP36, let’s discuss it briefly.
This temperature sensor is a low voltage sensor, requiring 2.7 V to 5.5 VDC input. It returns a Celsius temperature reading from the Vout pin in an operating range of -40°C to +125°C. It is reasonably accurate, especially for hobby/demo situations with a ±2°C accuracy. You can download the specs for the TMP36 here.
Temperature Sensor Project
Hardware Configuration
Make sure the NodeMCU is disconnected from USB when making connections.
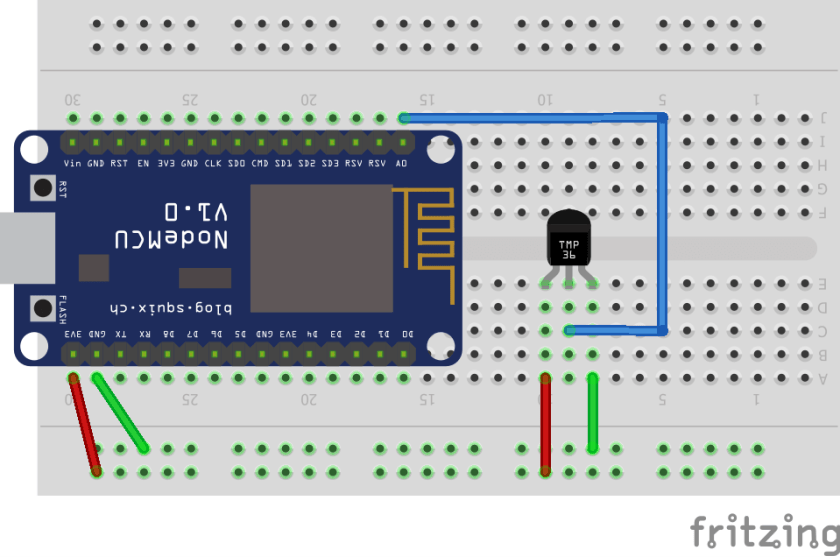
- To add the TMP36 sensor to the NodeMCU we need to make sure that it is properly oriented. The flat side of the temperature sensor should be facing the bottom of the board.
- Connect the rightmost lead, in position a8 to the negative rail on the board.
- The negative rail then is connected to the GND pin (pin a29)on the NodeMCU.
- Connect the leftmost lead (a10) of the TMP36 to the positive rail.
- Connect the 3v3 pin (a30) on the NodeMCU to the positive rail.
- Finally, connect a jumper wire from the center lead (c9) to the A0 pin on the NodecMCU (j16).
The A0 pin on the NodeMCU is the analog-to-digital conversion (ADC) pin.
Code
With the hardware side of things built, let’s see what we can do in MicroPython to get a temperature! Fortunately, MicroPython’s machine library makes this pretty simple for us.
I’ll be working in the console REPL. The code should work the same, however, if you are working in the WebREPL environment.
Our first step is to handle our imports
from machine import ADCThat brings in our necessary ADC connections, and we can assign a variable to pin 0 for that
adc = ADC(0)We can print out the value from the TMP36 now with adc.read() which returns the Celsius temperature, well almost. The value it returns is ten times the temperature. Let’s write a function that will handle that conversion for us.
def temp(value):
    return value/10
While we’re at it, let’s write a function to convert to Fahrenheit as well.
def fahrenheit(celsius):
    return (celsius * (9/5)) + 32
With those in place, we can get, and display our readings.
reading = adc.read()

celsius_temp = temp(reading)

fahrenheit_temp = fahrenheit(celsius_temp)

print("TMP36 reading {}\nDegrees Celsius {}\nDegrees Fahrenheit {}".format(reading, celsius_temp, fahrenheit_temp))
After executing our print statement we should get back our readings. MicroPython certainly has made things easy for us with the ADC methods.
For your convenience I have included the code is available as a Gist on GitHub as well.
Wrap Up
In this post, I have shown how to get temperature readings from an analog temperature sensor, such as the TMP36. In just a few lines of MicroPython code, we are able to get quite a bit of functionality. This is one of the many great things about MicroPython, the direct access to hardware is generally pretty easy.
I think the next step in exploring MicroPython and the NodeMCU will be to take these temperature readings and see if we can connect them to a service such as Losant and generate some visualizations of our temperatures.
Follow me on Twitter @kenwalger to get the latest updates on my postings on MicroPython and IoT and let me know what you are building with MicroPython.


