Flask Blood Glucose Tracker

My oldest daughter was diagnosed with Type 1 Diabetes at the age of two. Technology has come a long way in terms of tracking blood sugar levels, but I thought I would start a Python web application to do so. I’ll be using the Flask web framework for the project and, since I’m not a marketing or product naming genius, will call the project Flask Blood Glucose Tracker. I’m certainly open to other, more catchy, names.

This is somewhat of a different post for me, in that I’ll be walking through the generation of an actual application. The application will mostly be a minimal viable product (MVP) though. It should, however, be a good tutorial on how to integrate some concepts and technologies together. As such, in this first post, I’ll cover some of the project specifications and features that I’d like to include and work on implementing them in future posts.

Application for Diabetes

Diabetics have to check their blood glucose levels frequently, typically using a blood sugar monitor. These checks involve getting a small portion of blood from a finger (or arm) prick and having the monitor test it. It then returns a measurement of the amount of glucose in the blood as a number of milligrams per deciliter (mG/dL). These readings then will be the numbers we want to record in our application.

It is also important to know if the reading is taken before or after eating and the time of day the reading was taken. Therefore, the application will need to accommodate for that as well. The readings themselves, along with the time of day and relation to meal time are all factors into the amount of insulin needs to be injected.

Throughout this, and subsequent posts, I will do my best to explain diabetes-specific terms in as user-friendly of a way as possible. I am basing much of the numbers that I use, ranges of “good and bad”, etc. on managing my daughter’s diabetes over the last 14 years and the countless doctor appointments I’ve attended. As a disclaimer, I am not a medical professional. Please check with your physician about specifics with diabetes. There is a Diabetes For Dummies book which provides a decent overview as well.

Flask Blood Glucose Tracker Application Features

There are already a lot of excellent products on the market for keeping track of one’s blood sugar levels. With that in mind, this application is going to be fairly simple to start. I would like to build it with growth in mind, however, so building a REST API into the project seems like a good idea. My basic feature list to start with is:

  • Register for the BGT site, with email confirmation.
  • Login/Logout and based on role have different access.
    • Patient to access and edit my own data.
    • Physician to get a list of all current patient records.
    • Administrator for site maintenance.
  • Input blood sugar levels with date and time of reading and indication of before or after a meal or snack.
  • Display the data in a table with averages.
  • Display the data in a chart or visual format.
  • Typical CRUD operations for the data
  • REST API to expose patient blood sugars in a secure fashion
  • Data is stored in the cloud for accessibility and ease of database maintenance.

For the reporting features highlighting high and low blood sugar levels in the report would be helpful. Since what is “good” and “bad” can change for each individual, I’ll include a field for each individual to set that.

Application Stack

I have already mentioned that this application will be built with Flask. For the data store, I will use MongoDB. To keep in line with the feature request of storing data in the cloud, MongoDB offers a Database as a Service (DBaaS) called Atlas.

I haven’t quite figured out yet where I’ll ultimately host this application, perhaps Heroku? Or maybe on my own server.

Application Libraries

When it comes to libraries, there are a lot of choices. Here’s what I’ll be using, which will also be included in a requirements.txt file.

  • Flask version 0.12.2
  • Flask-Login, 0.4.0
  • Flask-PyMongo, 0.5.1
  • Bokeh, 0.12.6
  • Jinja2, 2.9.6
  • pandas, 0.20.2

There are other libraries that will but used as well, but those are the main ones of interest.

I’m also more of a fan of Zurb Foundation than Twitter Bootstrap, so I’ll be using that for styling.

Pages and Routes

Web Pages

To start with we need a way for a user to log in, enter their personal data, enter a new blood sugar record, edit their record, and view their information in both a tabular format and then in a chart format.

We’ll need the following pages, at least to start.

  • Index
  • Registration
  • Login/Logout Page
  • Profile page, login required
  • Records page (create, read, update, delete), login required
  • Chart page, login required

For a Physician we would want to be able to:

  • Display all of their patients, login required

For an Administrator, we want to be able to

  • Have the ability to manage users (patients & physicians) but not be able to see patient medical data.
REST API Routes

From the API I want to expose the ability to securely read and write (GET and POST) data to a patient’s record. This will make it easier to, for example, write a mobile application to connect to our data. Or, with the advances in blood sugar monitors, perhaps automatically update our application with readings from a device.

Document Model

Since I will be using MongoDB to store data for this application, I’ll be leveraging the document model. This offers a lot of flexibility in how data is stored, among other benefits. I would encourage you to read my blog post on the document model if you are not familiar with it.

To start with, the basic data we want to capture and model will be as follows:

BGT Sample Document
Sample Patient Record document

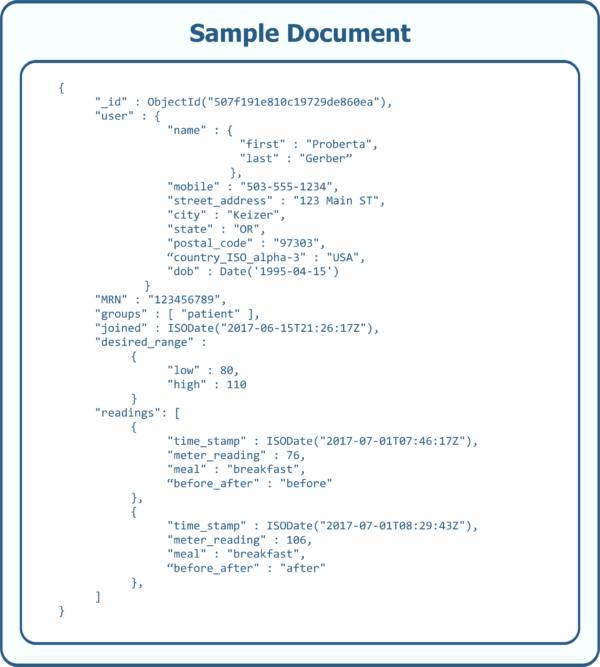
In looking at this sample document, the groups field will keep track of values such as patientphysician, and admin. I have chosen to implement the postal_code and MRN values as strings instead of integers to accommodate alpha-numeric values.

Through the course of developing this application, we will see the flexibility of the document model in action. We’ll see how we can utilize some of the features from MongoDB’s aggregation pipeline to handle our data processing as well.

Wrap Up

I have outlined a nice project here which will utilize several different bits of programming. In the next few posts then, I’ll cover how to implement all of these features into an MVP application. I would definitely enjoy receiving feedback, so please leave comments below.


Follow me on Twitter @kenwalger to get the latest updates on my postings.

Facebooktwitterredditlinkedinmail

MongoDB CRUD with Python

In my last post, we looked at how to combat Impostor Syndrome and came to the conclusion that deepening our knowledge on a given topic helps to sharpen of knowledge sword to fight our feelings of self doubt. If you missed that post, take a look here. This week let’s take a look at using the NoSQL database MongoDB with Python. In a related post, I’ll show how to implement them into web frameworks.

Planning

We will start with an exploration of CRUD operations in MongoDB using Python and PyMongo. Next, we’ll have a look at the Python web framework Bottle and then use Bottle with MongoDB to generate a simple web site. Then we’ll spend a bit of time using MongoDB with the Django web framework to generate a slightly more involved site than our Bottle version.

In this post, we kick off this series with a simple discussion of how to do some simple CRUD operations in Python similar to my post for doing CRUD operations in Java. Not familiar with CRUD? It stands for Create, Read, Update, and Delete. Those are the basic operations one will find themselves doing with any database, not just MongoDB.

In December of 2016, MongoDB released a new version of their database, 3.4, and I’m using 3.4.1 for this series of posts. While we aren’t going to go into any release specific features this week, we might in future posts, so I would encourage you to utilize the latest version. We will be touching on some of the features in the latest version of Python, 3.6, later on as well so make sure you are utilizing that version as well.

Python Driver – PyMongo

Okay, let’s concentrate on some basic implementations and general syntax of the Python driver for MongoDB as well as some basic database documents. Documents, by the way, are similar to a SQL database record.

The project code for this post will be available on GitHub and a link will be included at the end of the post. Let’s start off with our requirements.txt file to list out our project dependencies:

pymongo=='3.4.0'

With that in place we can do pip install -r requirements.txt to install the required version of the libraries for our project.

Another thing we will need for our project to work is a running instance of a MongoDB server. I am using version 3.4.1 and will assume that you have MongoDB 3.4 downloaded, installed, and running on the default address of localhost and port 27017. Further, since we are just sharpening our sword of knowledge here and don’t need MongoDB server authentication, let’s assume that feature is turned off or not implemented at all on our server.

Great, now that our environment is setup let’s enter into the planning stages a bit. What do we need to do?

  • Connect to the database
  • Insert an individual document into the database (Create)
  • Find and print a document in the database (Read)
  • Update the document in the database
  • Finally, Delete the document from the database

Let’s get started!

Database Connection

To setup our connection we will need to import MongoClient from pymongo, set the host and port we intend on using, and then select the database and collection we need. Remember that in MongoDB a collection is similar to a table in the SQL world in that it is a namespace for our data.

from pymongo import MongoClient

HOST = 'localhost'
PORT = 27017

client = MongoClient(HOST, PORT)
database = client.cookbook
recipes = database.recipes

Great, we now have a connection to the MongoDB database cookbook and the collection recipes. But wait, we didn’t ask to specifically create either of those, nor did we put anything into the collection yet. That’s correct, MongoDB generates that for us and waits for us to start using cookbook.recipes. Now, we need to add a basic recipe to our collection so that we have something with which to work.

We’ll define a single recipe document and insert it into our collection using the insert_one() method. Here‘s a link to further documentation on PyMongo’s collection level operations.

recipe = {'title': 'chocolate milk',
          'description': 'Yummy drink',
          'ingredients': [
              {'name': 'milk', 'quantity': 8, 'unit of measure': 'ounce'},
              {'name': 'chocolate syrup', 'quantity': 2, 'unit of measure': 'ounce'}
          ],
          'yield': {'quantity': 1, 'unit': 'glass'},
          'prep time': 0,
          'cook time': 0,
          'author': 'Biff Tannen',
          'uploaded_by': 'kenwalger',
          }

recipes.insert_one(recipe)

That’s all there is to it. We have just added a Chocolate Milk recipe to our collection. We just call the insert_one() method on our collection and pass in our document as an argument.

Reading the documents

Getting a document back out is pretty straight forward as well, we can simply use the find_one() function, which is a collection level operator from the PyMongo driver. It will, as the name would indicate, find a single document in the collection. This can be very useful to get an idea about the schema of the collection. Since we currently only have one record in our database, it should be perfect for getting our information out. I’m also going to include a new import pprint so that when we print out our data in a pretty fashion.

import pprint

print("\nPretty Printed document: \n")
pprint.pprint(recipes.find_one())

Our output should be as follows, with the _id value being different on your system:

Pretty Print: 

{'_id': ObjectId('588541a0146bde28a08217d4'),
 'author': 'Biff Tannen',
 'cook time': 0,
 'description': 'Yummy drink',
 'ingredients': [{'name': 'milk', 'quantity': 8, 'unit of measure': 'ounce'},
                 {'name': 'chocolate syrup',
                  'quantity': 2,
                  'unit of measure': 'ounce'}],
 'prep time': 0,
 'title': 'chocolate milk',
 'uploaded_by': 'kenwalger',
 'yield': {'quantity': 1, 'unit': 'glass'}}

Cool! We have seen how to do two of the four CRUD tasks already! And through the pymongo driver, it has been relatively straightforward to do so. We have a basic recipe for chocolate milk in our cookbook.

Update and Delete

But wait, we incorrectly attributed the recipe to Biff Tannen. As any fan of the Back to the Future movie series knows, chocolate milk is George McFly’s drink, not his arch enemy Biff’s. Let’s Update our database with that change using the update_one() method with the $set operator and print out the new record to make sure it accomplished what we wanted.

recipes.update_one({'title': 'chocolate milk'},
                   {'$set': {'author': 'George McFly'}
                    }
                   )
print("\nShould be George McFly: ")
pprint.pprint(recipes.find_one({'author': 'George McFly'}))

Great, and our output should now reflect that change and we can tell it is the same record because the collection unique _id value is still the same.

Should be George McFly: 
{'_id': ObjectId('588541a0146bde28a08217d4'),
 'author': 'George McFly',
 'cook time': 0,
 'description': 'Yummy drink',
 'ingredients': [{'name': 'milk', 'quantity': 8, 'unit of measure': 'ounce'},
                 {'name': 'chocolate syrup',
                  'quantity': 2,
                  'unit of measure': 'ounce'}],
 'prep time': 0,
 'title': 'chocolate milk',
 'uploaded_by': 'kenwalger',
 'yield': {'quantity': 1, 'unit': 'glass'}}

We have one task left, Delete. Which uses the delete_one() method. We need to pass in an argument for which document to delete which, given that our current collection only has one recipe in there we could use a variety of things to select it. Traditionally we would want to utilize the unique identifier _id to ensure that we are only deleting the document that we want.

recipes.delete_one('_id': ObjectId('588541a0146bde28a08217d4'))

Is all we need to do and our collection is empty again.

CRUD Wrap Up

In summary, we learned how to Create, Read, Update, and Delete documents in MongoDB in Python using the PyMongo driver. There is much improvement on the code to be made though by refactoring things into functions, error handling, etc. As mentioned at the top of this post, the next post will be on Bottle specifically to get up and running with that framework. After that, we will integrate MongoDB with Bottle at which time we will see some best practices for error handling and making these CRUD steps into functions.

Please let me know what you think in the comments below or reach out on Twitter where I am @kenwalger.

The code for this post can be seen in the GitHub repository here.

Happy coding!

Facebooktwitterredditlinkedinmail