MicroPython Temperature Sensor

I’ve shown an example of the “Hello World” in IoT, a blinking light, in this post. Blinking lights are great and make for a nice visual experience, but what if we want to do something with an IoT device, such as a NodeMCU ESP8266 that goes beyond the visual? Let’s take our NodeMCU and add a temperature sensor. Then, with MicroPython, we’ll get our readings.

Needed Equipment

To get started on this project you’ll need the following equipment:

I have found this kit of basic electronic components to be pretty good for starting one’s IoT device journey. It doesn’t include things like the TMP36 temperature sensor, but it has a wide variety of other pieces that are ultimately useful.

TMP36 Specs

Since this project will be using the TMP36, let’s discuss it briefly.

TMP36 Temperature Sensor

This temperature sensor is a low voltage sensor, requiring 2.7 V to 5.5 VDC input. It returns a Celsius temperature reading from the Vout pin in an operating range of -40°C to +125°C. It is reasonably accurate, especially for hobby/demo situations with a ±2°C accuracy. You can download the specs for the TMP36 here.

Temperature Sensor Project

Hardware Configuration

Make sure the NodeMCU is disconnected from USB when making connections.

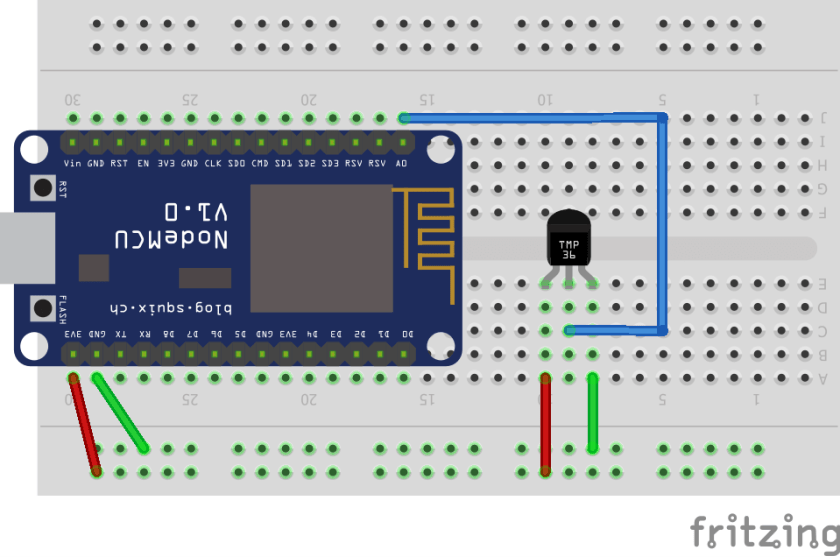
Temperature Sensor schematic

  1. To add the TMP36 sensor to the NodeMCU we need to make sure that it is properly oriented. The flat side of the temperature sensor should be facing the bottom of the board.
  2. Connect the rightmost lead, in position a8 to the negative rail on the board.
  3. The negative rail then is connected to the GND pin (pin a29)on the NodeMCU.
  4. Connect the leftmost lead (a10) of the TMP36 to the positive rail.
  5. Connect the 3v3 pin (a30) on the NodeMCU to the positive rail.
  6. Finally, connect a jumper wire from the center lead (c9) to the A0 pin on the NodecMCU (j16).

Temperature Sensor bread board

The A0 pin on the NodeMCU is the analog-to-digital conversion (ADC) pin.

Code

With the hardware side of things built, let’s see what we can do in MicroPython to get a temperature! Fortunately, MicroPython’s machine library makes this pretty simple for us.

I’ll be working in the console REPL.  The code should work the same, however, if you are working in the WebREPL environment.

Our first step is to handle our imports

from machine import ADC

That brings in our necessary ADC connections, and we can assign a variable to pin 0 for that

adc = ADC(0)

We can print out the value from the TMP36 now with adc.read() which returns the Celsius temperature, well almost. The value it returns is ten times the temperature. Let’s write a function that will handle that conversion for us.

def temp(value):
    return value/10

While we’re at it, let’s write a function to convert to Fahrenheit as well.

def fahrenheit(celsius):
    return (celsius * (9/5)) + 32

With those in place, we can get, and display our readings.

reading = adc.read()

celsius_temp = temp(reading)

fahrenheit_temp = fahrenheit(celsius_temp)

print("TMP36 reading {}\nDegrees Celsius {}\nDegrees Fahrenheit {}".format(reading, celsius_temp, fahrenheit_temp))

After executing our print statement we should get back our readings. MicroPython certainly has made things easy for us with the ADC methods.

Temperature Sensor REPL

For your convenience I have included the code is available as a Gist on GitHub as well.

Wrap Up

In this post, I have shown how to get temperature readings from an analog temperature sensor, such as the TMP36. In just a few lines of MicroPython code, we are able to get quite a bit of functionality. This is one of the many great things about MicroPython, the direct access to hardware is generally pretty easy.

I think the next step in exploring MicroPython and the NodeMCU will be to take these temperature readings and see if we can connect them to a service such as Losant and generate some visualizations of our temperatures.


Follow me on Twitter @kenwalger to get the latest updates on my postings on MicroPython and IoT and let me know what you are building with MicroPython.

Facebooktwitterredditlinkedinmail

Choosing a good Shard Key in MongoDB

I discussed, at a high level, the concept of sharing in MongoDB in a previous post. I mentioned that I would talk about what makes for a good shard key later on, and here we are. Before we talk about how to choose a good shard key, let’s first discuss it’s purpose.

When do we need to shard?

There are three typical reasons that we will want to shard a collection.

  1. The write workload on a single server exceeds that server’s capacity.
  2. The working set no longer fits into RAM.
  3. A single server can no longer handle the size of the dataset.

However, sharding earlier is better in an application’s lifecycle. There are significant performance considerations when sharding an existing collection.

Why do we need a Shard Key?

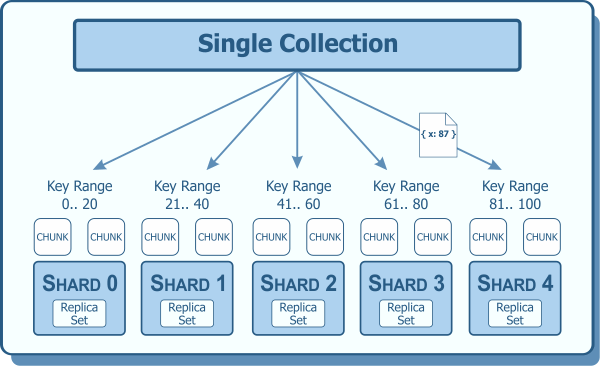
The shard key determines how data, specifically a collection’s documents, will be distributed across a sharded cluster in MongoDB. In a sharded collection, MongoDB uses the shard key to partition the data based on ranges of the key. Each range of the shard key values defines a non-overlapping value range. Further, each range is assigned to a specific chunk on the cluster. Sharded environments generally evenly distribute the chunks.

Sharding Example with Shard Key

The query router (the mongos server) directs the query to the appropriate chunk as data is requested from an application. It does the same for write requests, based on the shard key it directs to write to the appropriate chunk.

Choosing a Shard Key

As with MongoDB schema design considerations, choosing a shard key is heavily dependent on your application. The most frequent information needed to be read from and/or written to the database should be a key contributing factor. Depending on the application perhaps using a hashed ObjectId would be enough. In other applications, a single field may not be enough and a compound sharding key will be necessary.

When choosing a shard key, it impacts the cluster balancer and distribution of data across the shards. This has a large impact on sharded cluster performance and efficiency. An ideal shard key will allow for an even distribution of documents throughout the entire cluster. Beyond application specific requirements, there are a couple of technical factors to consider when choosing a shard key. A shard key cannot be changed once chosen for a collection, so these considerations are important.

Technical Considerations

The first consideration is cardinality. A shard key with high cardinality allows for better horizontal scaling. It does not, however, guarantee even data distribution across a sharded cluster.

The frequency of data is another factor in a good shard key. If the indexed field is, say user_name, and the data set is on the genealogical data for the Alger family, it would be expected that “Alger” occurs much more frequently than other names. This would cause the balance of documents to be uneven across the shards. One wants to choose a key that has low frequency, but that itself won’t guarantee even data distribution either.

High cardinality and low frequency are indeed important factors in shard key selection. The rate of change is the third leg of the shard key selection stool. Selecting a key that does not increase, or decrease, monotonically is important as well. A key that is always increasing results in inserts being routed to the shard with the maxKey as the upper bound. Thus, the shard will become unbalanced. With the minKey as the lower bound, decreasing results will be routed to that shard.

Each of these three legs of our stool contributes to data distribution. We need to consider each factor when selecting a key.

Example Shard Keys

Now that we have seen what some of the factors play into sharding performance, let’s look at some examples. To borrow a Hollywood movie title, The Good, the Bad & the Ugly, this can be true of our keys as well.

Shard keys must be based off an indexed field in the collection which exists across all documents. They can also be generated on a compound index in which the shard key is a prefix of that index. I covered indexing in MongoDB previously, as it is a topic all of itself. Since there are things to think about when indexing, it also impacts the shard keys.

The Ugly

I would say that ugly shard keys are those that not only don’t help your application but actually result in worse performance than when starting out. This would be something akin to using the _id field without hashing. Since _id is monotonically increasing, it would lead to an unbalanced system.

The Bad

I would categorize shard keys as bad that don’t fully take advantage of the concept of sharding. If, for example, collections are distributed across the shards and chunks, but the application’s read requests typically use an index different from the shard key index. While they may not have a negative impact on physical data distribution, they just aren’t properly optimized.

This results in a scatter/gather approach to the queries. The mongos server will scatter the request to all shards. Then gather the results together to send to the application. A targeted single server should be receiving the query with a well-chosen key.

The Good

This is where we all want to live, right? In a highly performant system environment with everything highly scaled and efficient. This can be achieved by selecting a shard key for a collection which optimizes an application’s needs with the technical strategies listed above.

Wrap Up

Choosing a correct shard key and the development of a sharding strategy is not always easy. Don’t make the mistake that because one application is sharded in a particular way, with a particular shard key, that it is a universal approach. Your application’s strategy may be entirely different, or sharding may not be the right solution for a particular collection.

Remember though, that it is important to establish a shard key and split your data early on. Sharding becomes more challenging in production with large data sets.

There are a lot of MongoDB specific terms in this post. I created a MongoDB Dictionary skill for the Amazon Echo line of products. Check it out and you can say “Alexa, ask MongoDB what is a Shard Key?” and get a helpful response.


Follow me on Twitter @kenwalger to get the latest updates on my postings.

Facebooktwitterredditlinkedinmail