

I have talked about MongoDB‘s Backend as a Service (BaaS) Stitch previously. In this post, let’s take a look at a basic Stitch application and how easy it is to get started. For this particular tutorial, we’ll be looking at basic Stitch functionality. However, I’ll point out some options along the way for extending the application.
The Stitch Application Overview
For this tutorial, let’s imagine an application that tracks blood glucose for diabetic patients. A blood sugar monitor, like the One Drop Chrome
, would send results to our application. Medical practitioners could see the results and leave comments on the reading. While beyond the scope of this tutorial, Stitch can integrate with a service such as Twilio to send the comments via SMS message to the patient for diabetic management suggestions. From a development perspective, this can be integrated with MongoDB 3.6 Change Streams as well.
A sample application page is available to view here with working comments attached to a MongoDB Atlas cluster and using Stitch. Let’s see how it was generated.
Cloud Services
Stitch runs on top of Atlas so we’ll need to set those services up.
Atlas
First off we’ll need to log into MongoDB Atlas or create an account. Then we’ll need to set up an Atlas Cluster. There is an option for an M0 level which is free and doesn’t require a credit card to get started. This is a great feature to be able to try out this incredible service.
Stitch is currently only located in the AWS US East 1 region so it is best to set your cluster up in that region for optimal performance. Once the cluster is configured, deployed, and initialized we’ll move onto setting up Stitch.
Stitch
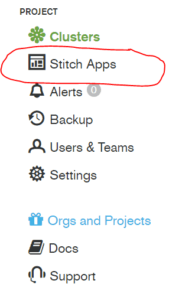
To get started setting up a Stitch application, in the MongoDB Atlas console, select the Stitch App option.
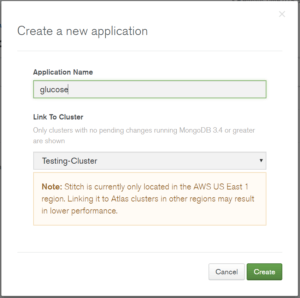
Then the Create New Application button in the upper right. Give the application a name, I’m calling this application glucose, and select the MongoDB Atlas Cluster you want to connect to.
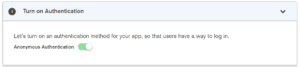
It will take a minute to spin up the new application. Once it is up and running, we’ll want to set authentication to Anonymous Authentication.
There are a few pieces of information we’ll need from this screen for our application. For this tutorial, we’ll be using the information from JS(Browser) but it is great to see support for Node.js, iOS, and Android configurations as well.
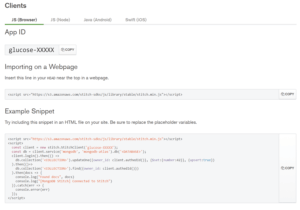
We’ll want to grab the <script> information from the Importing on a Webpage bit and add that to our HTML that we’ll generate. We’ll also need the App Id listed later on as well. But first, let’s setup our database and collection. We’ll want to click mongodb-atlas from the left navigation panel and then the Rules tab.
Connect the Database
Click NEW to add a new MongoDB collection. For the database, I’ve called mine glucose and I called the collection results. Now we’ll need to configure some permissions to allow, for the purposes of this tutorial, anyone to read the comments. Obviously, with sensitive and private medical data we would want to set the permissions to be more strict.
Under the Rules tab, click on the collection you just created and proceed to the Filters tab.
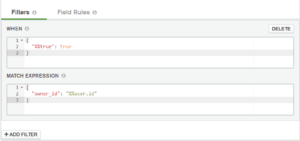
Delete this existing filter and click SAVE. Now head on over to the Field Rules tab. In the Permissions for top-level document section, we’ll want to change the Read rule to {} and click SAVE.
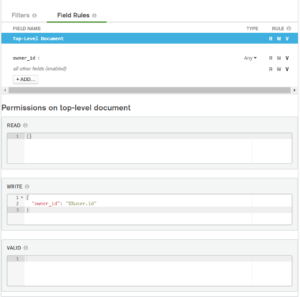
With these settings, we are allowing anyone to read any records in glucose.results, but only the owners can edit or delete their own comments. Stitch has integration with services such as Facebook and Google via OAuth. Further, custom authentication is possible with JSON Web Tokens.
Stitch the Application to the HTML
Now that we’ve set up our Stitch application on the backend, we need to integrate it into our HTML page. For this tutorial, we’re generating a static page with fake data. However, in a real application, we would use some dynamic content. At any rate, let’s see how we can proceed.
HTML
We’ll generate a basic HTML page with our <script> information in the <head> section. And we’ll include a form at the end to be able to get input from our medical professionals.
<!doctype html>
<html lang="en">
    <head>
        <meta charset="utf-8">
        <meta http-equiv="x-ua-compatible" content="ie-edge">
        <meta name="viewport" content="width=device-width, initial-scale=1.0">
        <title>Blood Glucose</title>
        <script src="https://s3.amazonaws.com/stitch-sdks/js/library/stable/stitch.min.js"></script>
    </head>
    <body>
        <h2>Sample Blood Glucose Report</h2>
        <div>
            <p>Patient Id: 12345</p>
            <p>Date: 5 November 2017</p>
            <p>Time: 07:23am</p>
            <p>Reading was taken: Before Breakfast</p>
            <p>Result: 110</p>
            <hr>
            <div id="comments">
            </div>
            <hr>
            <form>
                <label for="new_comment">Add Comments:</label>
                <input id="new_comment">
                <input class="button" type="submit">
            </form>
        </div>
    </body>
</html>
Let’s also think about what we’re trying to do with our JavaScript and add in the appropriate hooks in our HTML before we tackle our JavaScript.
Since we want our comments to load when the page does, let’s add an onload to the <body> tag:
<body onload="displayCommentsOnLoad()">
We’ll also need to add an on click listener to our form:
<input class="button" type="submit" onClick="addComment()">
Nice. It seems like, then, that we have three JavaScript functions to write to get our functionality implemented. The two mentioned and a third displayComments seems like it will be necessary. Let’s tackle those functions next in glucose.js.
JavaScript
glucose.js
const client = new stitch.StitchClient('glucose-XXXXX');
const db = client.service('mongodb', 'mongodb-atlas').db('glucose');

function displayCommentsOnLoad() {
    client.login().then(displayComments();
}

function displayComments() {
    db.collection('results').find({}).then(docs => {
        const html = docs.map(c => "<div>" + c.comment + "</div>").join("");
        document.getElementByID("comments").innerHTML = html;
    });
}

function addComment() {
    const foo = document.getElementById("new_comment");
    db.collection("results").insert({owner_id : client.authedId(), comment : foo.value}).then(displayComments);
    foo.value = "";
}
You’ll want to alter the glucose-XXXXX to utilize the App Id for your own application and if you are using a different database and/or collection names, make those changes as well.
We’ll also need to add the script to our HTML in the <head> section:
<script src="glucose.js"></script>
I have the completed project code, with some minimal Foundation styling available on GitHub as well.
Wrap Up
And that’s it! Neat. We now have a basic web page that will accept comments from a user (medical professional) and, through the power of Stitch, save the comments in a MongoDB Atlas hosted database. Stitch has provided the backend power and we just had to write some minimal JavaScript functions to handle the button click and document insert into our collection.
Follow me on Twitter @kenwalger to get the latest updates on my postings. Or better yet, sign up for the email list to get updates in your mailbox!
There are a few MongoDB specific terms in this post. I created a MongoDB Dictionary skill for the Amazon Echo line of products. Check it out and you can say “Alexa, ask MongoDB for the definition of a document?” and get a helpful response.