Indexing in MongoDB


I get asked about and see a lot of posts and comments on the internet about MongoDB not being as quick on query reads as people think it should be. These questions and/or comments are often followed by a panning of MongoDB itself. Often based on the user’s experience in this one situation. My first question in these situations typically is “What indexes are set up on your collection that relate to your queries?” More often than not I get a deer in headlights look back at me. After some stammering, the answer typically is “I don’t know.”, “Is indexing important?”, “Whatever is standard.”, or the most popular, “What’s an index?”.

Indexing Overview

In this blog post, I’d like to touch briefly on what indexes are in MongoDB and how they greatly impact performance. What is an index? If we start with the definition provided by MongoDB:

Indexes are special data structures that store a small portion of the collection’s data set in an easy to traverse form.

we get an idea from the “easy to traverse” statement that they make something that is complicated, easier. In this case, indexes make traversing a collection easier (faster).

Let’s consider a data set that includes all of the postal codes in the United States. (zips.json can be downloaded here). Without an appropriate index if our application wants to find, for example, the zip code for a particular city, let’s say Keizer, Oregon (97303), MongoDB would have to scan our entire collection for that city to return the appropriate zip code. In fact, based on our data set, it would have to look through all 29,467 records to be able to find and return the one record.

That’s a lot of unnecessary looking through the database to try to find the correct match of our search term. Imagine if our data set was much larger and included a million or more records. That would be a lot of overhead and searching. If we look at what is going on in a basic query for looking for our city of “KEIZER” buy having MongoDB explain the execution stats for our query, db.zips.find({"city": "KEIZER"}).explain("executionStats"), we can see a few things that are performance bottlenecks.

No Index Used
Full Collection Scan

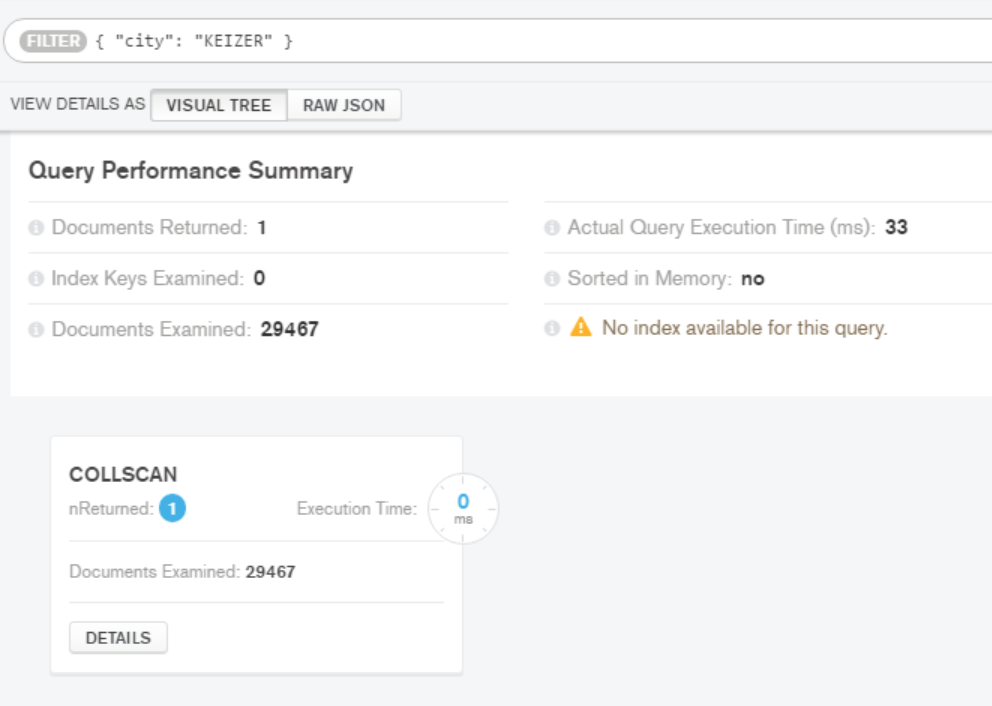
First, we see that even in our relatively small database the query execution time was 34ms. Then, as expected, we looked at all 29,467 documents and that a collection scan was performed to do this query. Again imagine scanning a much larger data set and how that could be a slow process.

Now, what happens if we add an index? Since we are, in this case, searching by city name, it would make sense to create an index on that field. That can be accomplished in the Mongo Shell with the command:

db.zips.createIndex({"city": 1})

Which will create an ascending index on the city field in our collection. Now if we run the same query as before we should expect a couple of things. First, our query execution time should be significantly lower as well as the documents examined number.

Index Used
Find with a defined and used Index

Wow, with an index in place on the city field, doing a search on a city we get some amazing improvements. Our Actual Query Execution Time went from 34ms to zero, we are doing an index scan now (IXSCAN) instead of a collection scan (COLLSCAN) and the number of documents examined decreased to only having to examine a single document. That’s pretty powerful and highlights the need to have indexes on your collection.

After explaining this to MongoDB users I often get a “Why don’t I just index every field then?” response. Well, there’s no such thing as a free lunch, right? Indexes come with overhead. Some examples include memory usage and write performance of your data due to having to update indexes based on new data being stored.

We could also create indexes on multiple fields as well. We might, for example, not only be querying our database on a single city but on a city and state combination. In that case, we might want to look at generating a compound index that references multiple fields in the same index. In this example something like db.zips.createIndex({"city": 1, "state": 1}) might be useful.

Wrap Up

When deciding on an index to create there are a few common things to think about in general. First, create indexes which support your queries. If you are not going to query the zip code collection based on population (“pop”), there isn’t a need to generate an index for that field. Second, if your queries are doing sort operations, make sure that your indexes are supporting those in an efficient way. Third, make sure that your queries are allowing MongoDB to be selective in the results it provides from the query. This allows MongoDB to use the index for the majority of the work.

Indexes are an important part of proper application design with MongoDB. Having a properly designed index can have a large positive impact on the performance of your application. I would highly recommend reading more about them prior to your application deployment to ensure a great end user experience.

Facebooktwitterredditlinkedinmail

MongoDB CRUD with Python

In my last post, we looked at how to combat Impostor Syndrome and came to the conclusion that deepening our knowledge on a given topic helps to sharpen of knowledge sword to fight our feelings of self doubt. If you missed that post, take a look here. This week let’s take a look at using the NoSQL database MongoDB with Python. In a related post, I’ll show how to implement them into web frameworks.

Planning

We will start with an exploration of CRUD operations in MongoDB using Python and PyMongo. Next, we’ll have a look at the Python web framework Bottle and then use Bottle with MongoDB to generate a simple web site. Then we’ll spend a bit of time using MongoDB with the Django web framework to generate a slightly more involved site than our Bottle version.

In this post, we kick off this series with a simple discussion of how to do some simple CRUD operations in Python similar to my post for doing CRUD operations in Java. Not familiar with CRUD? It stands for Create, Read, Update, and Delete. Those are the basic operations one will find themselves doing with any database, not just MongoDB.

In December of 2016, MongoDB released a new version of their database, 3.4, and I’m using 3.4.1 for this series of posts. While we aren’t going to go into any release specific features this week, we might in future posts, so I would encourage you to utilize the latest version. We will be touching on some of the features in the latest version of Python, 3.6, later on as well so make sure you are utilizing that version as well.

Python Driver – PyMongo

Okay, let’s concentrate on some basic implementations and general syntax of the Python driver for MongoDB as well as some basic database documents. Documents, by the way, are similar to a SQL database record.

The project code for this post will be available on GitHub and a link will be included at the end of the post. Let’s start off with our requirements.txt file to list out our project dependencies:

pymongo=='3.4.0'

With that in place we can do pip install -r requirements.txt to install the required version of the libraries for our project.

Another thing we will need for our project to work is a running instance of a MongoDB server. I am using version 3.4.1 and will assume that you have MongoDB 3.4 downloaded, installed, and running on the default address of localhost and port 27017. Further, since we are just sharpening our sword of knowledge here and don’t need MongoDB server authentication, let’s assume that feature is turned off or not implemented at all on our server.

Great, now that our environment is setup let’s enter into the planning stages a bit. What do we need to do?

  • Connect to the database
  • Insert an individual document into the database (Create)
  • Find and print a document in the database (Read)
  • Update the document in the database
  • Finally, Delete the document from the database

Let’s get started!

Database Connection

To setup our connection we will need to import MongoClient from pymongo, set the host and port we intend on using, and then select the database and collection we need. Remember that in MongoDB a collection is similar to a table in the SQL world in that it is a namespace for our data.

from pymongo import MongoClient

HOST = 'localhost'
PORT = 27017

client = MongoClient(HOST, PORT)
database = client.cookbook
recipes = database.recipes

Great, we now have a connection to the MongoDB database cookbook and the collection recipes. But wait, we didn’t ask to specifically create either of those, nor did we put anything into the collection yet. That’s correct, MongoDB generates that for us and waits for us to start using cookbook.recipes. Now, we need to add a basic recipe to our collection so that we have something with which to work.

We’ll define a single recipe document and insert it into our collection using the insert_one() method. Here‘s a link to further documentation on PyMongo’s collection level operations.

recipe = {'title': 'chocolate milk',
          'description': 'Yummy drink',
          'ingredients': [
              {'name': 'milk', 'quantity': 8, 'unit of measure': 'ounce'},
              {'name': 'chocolate syrup', 'quantity': 2, 'unit of measure': 'ounce'}
          ],
          'yield': {'quantity': 1, 'unit': 'glass'},
          'prep time': 0,
          'cook time': 0,
          'author': 'Biff Tannen',
          'uploaded_by': 'kenwalger',
          }

recipes.insert_one(recipe)

That’s all there is to it. We have just added a Chocolate Milk recipe to our collection. We just call the insert_one() method on our collection and pass in our document as an argument.

Reading the documents

Getting a document back out is pretty straight forward as well, we can simply use the find_one() function, which is a collection level operator from the PyMongo driver. It will, as the name would indicate, find a single document in the collection. This can be very useful to get an idea about the schema of the collection. Since we currently only have one record in our database, it should be perfect for getting our information out. I’m also going to include a new import pprint so that when we print out our data in a pretty fashion.

import pprint

print("\nPretty Printed document: \n")
pprint.pprint(recipes.find_one())

Our output should be as follows, with the _id value being different on your system:

Pretty Print: 

{'_id': ObjectId('588541a0146bde28a08217d4'),
 'author': 'Biff Tannen',
 'cook time': 0,
 'description': 'Yummy drink',
 'ingredients': [{'name': 'milk', 'quantity': 8, 'unit of measure': 'ounce'},
                 {'name': 'chocolate syrup',
                  'quantity': 2,
                  'unit of measure': 'ounce'}],
 'prep time': 0,
 'title': 'chocolate milk',
 'uploaded_by': 'kenwalger',
 'yield': {'quantity': 1, 'unit': 'glass'}}

Cool! We have seen how to do two of the four CRUD tasks already! And through the pymongo driver, it has been relatively straightforward to do so. We have a basic recipe for chocolate milk in our cookbook.

Update and Delete

But wait, we incorrectly attributed the recipe to Biff Tannen. As any fan of the Back to the Future movie series knows, chocolate milk is George McFly’s drink, not his arch enemy Biff’s. Let’s Update our database with that change using the update_one() method with the $set operator and print out the new record to make sure it accomplished what we wanted.

recipes.update_one({'title': 'chocolate milk'},
                   {'$set': {'author': 'George McFly'}
                    }
                   )
print("\nShould be George McFly: ")
pprint.pprint(recipes.find_one({'author': 'George McFly'}))

Great, and our output should now reflect that change and we can tell it is the same record because the collection unique _id value is still the same.

Should be George McFly: 
{'_id': ObjectId('588541a0146bde28a08217d4'),
 'author': 'George McFly',
 'cook time': 0,
 'description': 'Yummy drink',
 'ingredients': [{'name': 'milk', 'quantity': 8, 'unit of measure': 'ounce'},
                 {'name': 'chocolate syrup',
                  'quantity': 2,
                  'unit of measure': 'ounce'}],
 'prep time': 0,
 'title': 'chocolate milk',
 'uploaded_by': 'kenwalger',
 'yield': {'quantity': 1, 'unit': 'glass'}}

We have one task left, Delete. Which uses the delete_one() method. We need to pass in an argument for which document to delete which, given that our current collection only has one recipe in there we could use a variety of things to select it. Traditionally we would want to utilize the unique identifier _id to ensure that we are only deleting the document that we want.

recipes.delete_one('_id': ObjectId('588541a0146bde28a08217d4'))

Is all we need to do and our collection is empty again.

CRUD Wrap Up

In summary, we learned how to Create, Read, Update, and Delete documents in MongoDB in Python using the PyMongo driver. There is much improvement on the code to be made though by refactoring things into functions, error handling, etc. As mentioned at the top of this post, the next post will be on Bottle specifically to get up and running with that framework. After that, we will integrate MongoDB with Bottle at which time we will see some best practices for error handling and making these CRUD steps into functions.

Please let me know what you think in the comments below or reach out on Twitter where I am @kenwalger.

The code for this post can be seen in the GitHub repository here.

Happy coding!

Facebooktwitterredditlinkedinmail